 One day, I was at my mum's place doing some sewing and I wanted to bring the needle(took from mum's sewing box, not sure why I'm so cheapskate :S) home. I found a cut off legging from my mum's pants and I just pinned my needle there with the remaining thread tucked in the tube. The needle and thread stay there so well, it's so convenient to bring them around and not to say save thread that is still long enough for use, which I will usually throw away as it seems so troublesome to keep.
 Threads in plastic container. I don't have the leisurely of big spaces to store my sewing stuffs, my area get dusty easy too, so I like to keep them in container. However I think it would be great to be able to keep them in thread spool holder.
Used to keep the bobbin threads in a metal container but they ended up all entangled after sometimes. So now I'm keep them seperately in another container like this. Currently this is the best solution I can think of. How do you keep your threads?

Showing posts with label how-to. Show all posts
Showing posts with label how-to. Show all posts
Tuesday, August 10, 2010
How do you keep your sewing tools Part 2
This is how I keep my needles. It looks like how the Chinese doctor will keep their acupuncture needles, hehehehe ;P


Monday, August 2, 2010
How do you keep your sewing tools? Part 1
Things are moving very slow for the past few weeks. I have been coughing for more than 2 weeks. It's so bad that it kept me from wake in the night and this in turn made me feeling tired and lethargic in the day. Been to the doctor, much better but still coughing (when is it going to stop??!!)
Despite the large amount of awake hours, I didn't get much done. Mangaged to clear a bit of my sewing stuffs during one of the sleepless night.
 Sewing pins in a small cute biscuit container (with pin cushion inside). I like how the pins can be easily kept away (just closed the tin) when it is not in use and I never get pricked when I reach out for the pins since I started using this.
To make this, all you have to do is make a big fat pin cushion and stuff it in a container (you can even use gluegun to fix it permanently, for me I just stuff it in). Just make sure that your pin cushion is slightly bigger than the container so that it won't shift when it's inside. And not to forget that your completed cushion will actually turn out smaller than the size of your cut out fabric when it is fatten/stuffed.
Too complicated? Need a tutorial? Just leave me a comment and let me know. Would love to know how you keep your pins too.
Will share more in the later posts.
Despite the large amount of awake hours, I didn't get much done. Mangaged to clear a bit of my sewing stuffs during one of the sleepless night.
 Sewing pins in a small cute biscuit container (with pin cushion inside). I like how the pins can be easily kept away (just closed the tin) when it is not in use and I never get pricked when I reach out for the pins since I started using this.
To make this, all you have to do is make a big fat pin cushion and stuff it in a container (you can even use gluegun to fix it permanently, for me I just stuff it in). Just make sure that your pin cushion is slightly bigger than the container so that it won't shift when it's inside. And not to forget that your completed cushion will actually turn out smaller than the size of your cut out fabric when it is fatten/stuffed.
Too complicated? Need a tutorial? Just leave me a comment and let me know. Would love to know how you keep your pins too.
Will share more in the later posts.
Thursday, April 8, 2010
How to: "Raspberry Torte" Applique
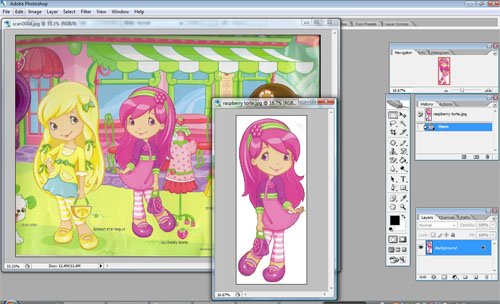
Scan your desired picture or simply get one from the net, and do the necessary editing in photoshop. I scanned the picture of Raspberry Torte from a poster and erased the background. Next, we have to MIRROR THE IMAGE, this is very important if your picture contain wordings, as the final applique will be a mirror image of what you are going to print out. You will understand better as you read along.
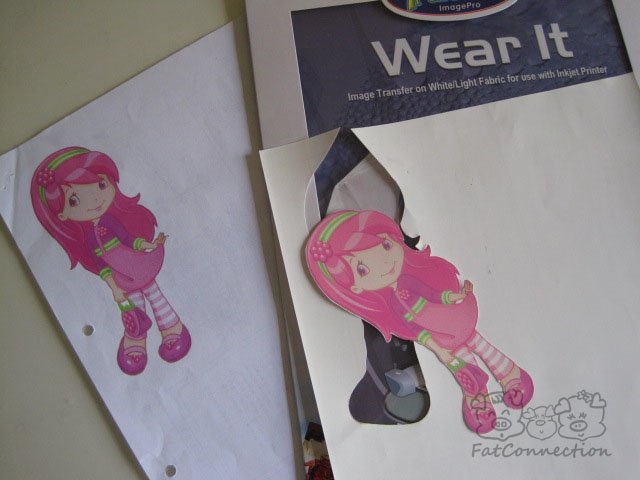
I did a print on a piece of paper to confirm the actual size of my Raspberry Torte. After that, I printed it on an IMAGE/HEAT TRANSFER PAPER for fabric and cut it out.
As the t-shirt I'm using has multi-colours, my Raspberry Torte won't look nice if I iron it directly on the t-shirt, (if your t-shirt/bag/whatever is light in colour, you may want to iron the image directly on the t-shirt/bag & ....... ) so I ironed it on a piece of light colour cotton knit first.
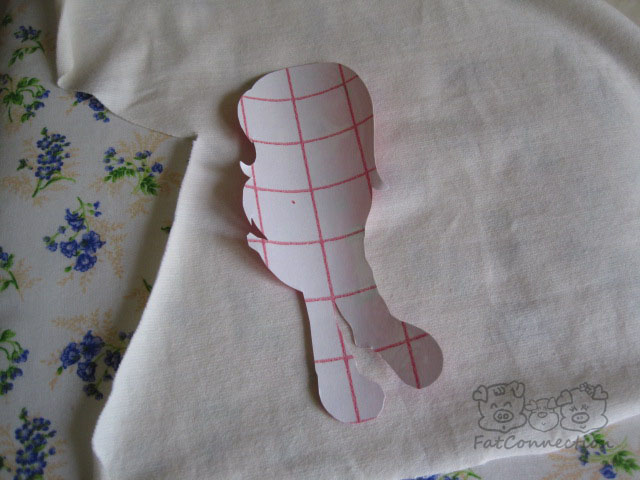
Iron the fabric surface to remove any crease. Put your cut out image facing down on the fabric(as shown). Apply hot, dry iron at light pressure to fix the image in position, then press firmly for about 1-3 mins, making sure to keep the iron constantly moving.

When the fabric has cool down, gently peel away the backing.
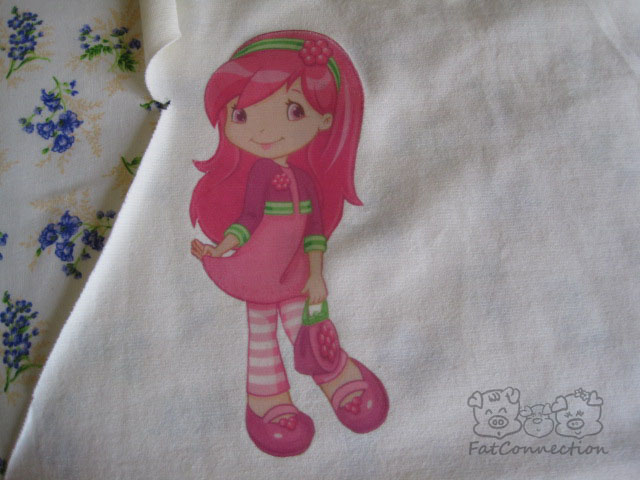
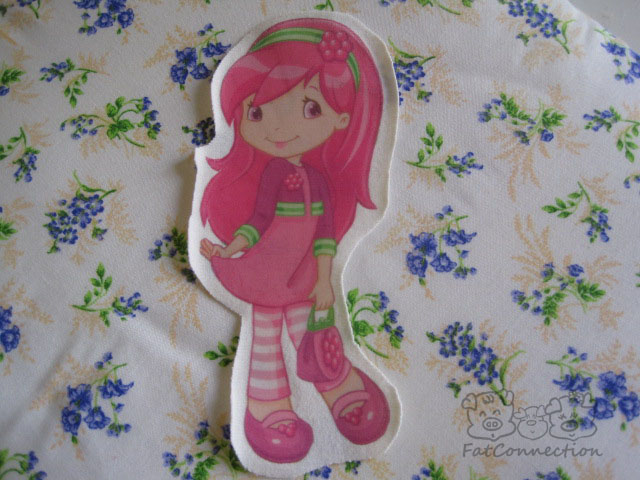
Cut around the image, leaving a brim around it. And we are going to sew this on the t-shirt. Now you can see that the ironed image is actually a mirror image of what we have printed out.
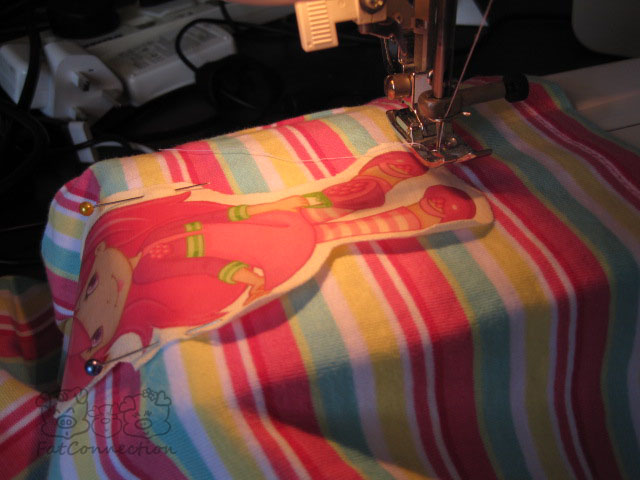
Fix the fabric cut out image on the t-shirt with pins and sew along the edge.

As knit fabric doesn't fray, you do not have to worry about the edges at all. So it's done!
:)
Tuesday, December 29, 2009
A little sewing tip
Last few days for 20% OFF all Japanese fabrics.
************************************************
A little something to share: How to get your seam done quickly.
First, we have to make a grid cardboard to guide us. You can use this over and over again, so you only have to do this once.
 Paste a graph paper onto a thin cardboard, use spray adhesive for best result.
 Trim away the excess cardboard and paper, all the way to where the grid squares are. And your grid guide is done.
1 small increment of my graph paper is 2mm, so 1 big square is 2 cm. If required, you may draw lines with colour pens for indication of your commonly use seam allowances.
 Using the grid cardboard as guide, fold the required seam allowance and iron it with the cardboard sandwich in between.
 Now with the grid cardboard as guide, you do not have to draw lines for seam allowance, and it makes thing a lot easier
 Remove the cardboard and iron again, so that your seam line is flat and neat.
 Do a double fold on the seam if required. Sew along the edge and your seam is done.
 This little cardboard came in very handy and help me saved a lot of time when I sewed the shirred dresses. Hope that it is useful to you too.
Wednesday, December 9, 2009
How to - By Hanhan
Chef Hanhan teaches us how to wrap wanton (meat dumpling).
LOL......
It's so funny to see how she demonstrates and gives instruction at the same time.
LOL......
It's so funny to see how she demonstrates and gives instruction at the same time.
Monday, July 13, 2009
Ribbon sticks
.jpg) Had lots of fun making and playing with these ribbon sticks with Hanhan this afternoon.
Had lots of fun making and playing with these ribbon sticks with Hanhan this afternoon.All you need to do is just cut one/many long strip of ribbon and tape them onto a balloon stick.
Friday, July 10, 2009
New Old top tutorial
This top wasn't made as planned so you might find it a bit confused if you don't read the instructions.
.jpg) I'm using a spaghatti top as shown. Cut it into 3 parts, from bottom: the main body piece, the suppose to be shoulder straps for the top (which eventually didn't happen), and the excess.
I'm using a spaghatti top as shown. Cut it into 3 parts, from bottom: the main body piece, the suppose to be shoulder straps for the top (which eventually didn't happen), and the excess. .jpg) Use fold-over elastic(FOE) to gather the top of the main body piece using zigzag stitch. Remember only stretch the FOE and not the knit fabric or you won't get create any gather, you might want to refer to here. I leave a bit at the end, fold in and sew with hand so that it look neater.
Use fold-over elastic(FOE) to gather the top of the main body piece using zigzag stitch. Remember only stretch the FOE and not the knit fabric or you won't get create any gather, you might want to refer to here. I leave a bit at the end, fold in and sew with hand so that it look neater.
.jpg) The following is what I planned to be the shoulder straps, but I played with the cloth and at the end I didn't have enough for this, partly because I forgot that my girl has grown up :P If you are not playing with the cloth you should have enough to made beautiful shoulder straps by doing gather with FOE. You don't need to do anything to the other side of the strap, as knit don't fray. Attached them to the main body piece to be the shoulder strap and it's done!
The following is what I planned to be the shoulder straps, but I played with the cloth and at the end I didn't have enough for this, partly because I forgot that my girl has grown up :P If you are not playing with the cloth you should have enough to made beautiful shoulder straps by doing gather with FOE. You don't need to do anything to the other side of the strap, as knit don't fray. Attached them to the main body piece to be the shoulder strap and it's done!
.jpg) This would be how it should look like if I'm using the above pieces for the shoulder straps. However, the leftover pieces were not long enough so I use the original straps from the old top instead.
This would be how it should look like if I'm using the above pieces for the shoulder straps. However, the leftover pieces were not long enough so I use the original straps from the old top instead.
.jpg) I also attached pockets and I think it look much cuter with them. Love the Cheesy Mousey fabric.
I also attached pockets and I think it look much cuter with them. Love the Cheesy Mousey fabric.
.jpg)
The pocket is another trial and error thing, didn't take any photo, if you like to have a tutorial on the pocket, let me know, maybe I can do one on another day.
.jpg) I'm using a spaghatti top as shown. Cut it into 3 parts, from bottom: the main body piece, the suppose to be shoulder straps for the top (which eventually didn't happen), and the excess.
I'm using a spaghatti top as shown. Cut it into 3 parts, from bottom: the main body piece, the suppose to be shoulder straps for the top (which eventually didn't happen), and the excess. .jpg) Use fold-over elastic(FOE) to gather the top of the main body piece using zigzag stitch. Remember only stretch the FOE and not the knit fabric or you won't get create any gather, you might want to refer to here. I leave a bit at the end, fold in and sew with hand so that it look neater.
Use fold-over elastic(FOE) to gather the top of the main body piece using zigzag stitch. Remember only stretch the FOE and not the knit fabric or you won't get create any gather, you might want to refer to here. I leave a bit at the end, fold in and sew with hand so that it look neater..jpg) The following is what I planned to be the shoulder straps, but I played with the cloth and at the end I didn't have enough for this, partly because I forgot that my girl has grown up :P If you are not playing with the cloth you should have enough to made beautiful shoulder straps by doing gather with FOE. You don't need to do anything to the other side of the strap, as knit don't fray. Attached them to the main body piece to be the shoulder strap and it's done!
The following is what I planned to be the shoulder straps, but I played with the cloth and at the end I didn't have enough for this, partly because I forgot that my girl has grown up :P If you are not playing with the cloth you should have enough to made beautiful shoulder straps by doing gather with FOE. You don't need to do anything to the other side of the strap, as knit don't fray. Attached them to the main body piece to be the shoulder strap and it's done!.jpg) This would be how it should look like if I'm using the above pieces for the shoulder straps. However, the leftover pieces were not long enough so I use the original straps from the old top instead.
This would be how it should look like if I'm using the above pieces for the shoulder straps. However, the leftover pieces were not long enough so I use the original straps from the old top instead..jpg) I also attached pockets and I think it look much cuter with them. Love the Cheesy Mousey fabric.
I also attached pockets and I think it look much cuter with them. Love the Cheesy Mousey fabric..jpg)
The pocket is another trial and error thing, didn't take any photo, if you like to have a tutorial on the pocket, let me know, maybe I can do one on another day.
Tuesday, July 7, 2009
Healthy no-bake treats
Chocolate coco pop biscuits.
This is really easy to make. Just melt your chocolate, stir in your coco pop or other cereals then scoop them into mold or tray covered with wax paper. Put them into the fridge and wait for them to harden, then EAT, EAT, EAT.........jpg) I know mine don't look appetitizing, but they taste really good. I tried to use a bear shape cookie cutter as mold but as you can see..... they don't come out well. Next time I should just scoop it into balls or just spread it flat.
I know mine don't look appetitizing, but they taste really good. I tried to use a bear shape cookie cutter as mold but as you can see..... they don't come out well. Next time I should just scoop it into balls or just spread it flat.Did Hanhan help Mummy? Not really...... because she was too busy with eating.
.jpg)
Monday, April 13, 2009
Chocolate Mousse Cake?!
Hanhan loves to eat cake, she had been requesting for cakes these few days and we had an enjoyable weekend, going from places to places eating cakes. :) Some taste good but some really not up to standard to be served in a restuarant, Daddy said that I can bake better than them ;> that's really flattering, and it set the mood for baking.
.jpg) Sponge cake base similar to the Christmas log cake, but I added slightly more chocolate to get a darker shade and more chocolatey taste.
Sponge cake base similar to the Christmas log cake, but I added slightly more chocolate to get a darker shade and more chocolatey taste.
.jpg) For chocolate mousse, I followed a recipe found on the net. I do not have a cooking thermometer, and was cautious about Salmonella poisoning, therefore, I just cooked the egg yolk, and the rest of the methods were the same. In the end, I realised the "mousse" was basicially made from egg yolk, chocolate and whipping cream. :P I think next time I will just leave out the egg yolk, and make chocolate whipped cream (no worries about Salmonella poisoning).
For chocolate mousse, I followed a recipe found on the net. I do not have a cooking thermometer, and was cautious about Salmonella poisoning, therefore, I just cooked the egg yolk, and the rest of the methods were the same. In the end, I realised the "mousse" was basicially made from egg yolk, chocolate and whipping cream. :P I think next time I will just leave out the egg yolk, and make chocolate whipped cream (no worries about Salmonella poisoning).
.jpg) A layer of ganache, to give the cake a nice shiny outer layer.
A layer of ganache, to give the cake a nice shiny outer layer.
.jpg) Sponge cake base similar to the Christmas log cake, but I added slightly more chocolate to get a darker shade and more chocolatey taste.
Sponge cake base similar to the Christmas log cake, but I added slightly more chocolate to get a darker shade and more chocolatey taste..jpg) For chocolate mousse, I followed a recipe found on the net. I do not have a cooking thermometer, and was cautious about Salmonella poisoning, therefore, I just cooked the egg yolk, and the rest of the methods were the same. In the end, I realised the "mousse" was basicially made from egg yolk, chocolate and whipping cream. :P I think next time I will just leave out the egg yolk, and make chocolate whipped cream (no worries about Salmonella poisoning).
For chocolate mousse, I followed a recipe found on the net. I do not have a cooking thermometer, and was cautious about Salmonella poisoning, therefore, I just cooked the egg yolk, and the rest of the methods were the same. In the end, I realised the "mousse" was basicially made from egg yolk, chocolate and whipping cream. :P I think next time I will just leave out the egg yolk, and make chocolate whipped cream (no worries about Salmonella poisoning)..jpg) A layer of ganache, to give the cake a nice shiny outer layer.
A layer of ganache, to give the cake a nice shiny outer layer. Yum yum, I love this cake. Daddy loves it too. It's really chocolatey.
.jpg) I am not an expert in baking, but I love to try out different cakes, especially chocolate cakes ;) and I really love this sponge cake base. With ovalett/emusifier, it is really easy to make a sponge cake. Here is the recipe(with some lazy modification, correct me if you think that is seriously wrong):
I am not an expert in baking, but I love to try out different cakes, especially chocolate cakes ;) and I really love this sponge cake base. With ovalett/emusifier, it is really easy to make a sponge cake. Here is the recipe(with some lazy modification, correct me if you think that is seriously wrong): .jpg) If you tried out the above recipe, let me know what version of sponge cake you have made, I would like to try too :)
If you tried out the above recipe, let me know what version of sponge cake you have made, I would like to try too :)
.jpg) I am not an expert in baking, but I love to try out different cakes, especially chocolate cakes ;) and I really love this sponge cake base. With ovalett/emusifier, it is really easy to make a sponge cake. Here is the recipe(with some lazy modification, correct me if you think that is seriously wrong):
I am not an expert in baking, but I love to try out different cakes, especially chocolate cakes ;) and I really love this sponge cake base. With ovalett/emusifier, it is really easy to make a sponge cake. Here is the recipe(with some lazy modification, correct me if you think that is seriously wrong):Ingredients (just nice for a 229" circle pan) (what am I writing? 22"?!)
1) 3 eggs
2) 50 g sugar
3) 1 teaspoon vanilla essence
4) 1/4 Tablespoon sweeten condensed milk
5) 1/4 Tablespoon ovalett/emusifier
6) 50g sifted top flour
7) 15g sifted corn flour
8) 1/4 teaspoon baking powder
9) 25 g melted butter/cooking oil
10) chocolate/cocoa powder (for chocolate cake, and add as you like)
Methods:
1) Beat ingredients 1 to 5 till ribbon forms.
2) Add in ingredients 6 to 8 ( + 10 optional ), fold in till combine.
3) Fold in cooled melted butter/cooking oil.
4) Put into preheated oven, bake at 175 degree celsius for about 20 mins.
* temperature and time differ from oven to oven, as the temperature indicated on the oven might not be accurate
.jpg) If you tried out the above recipe, let me know what version of sponge cake you have made, I would like to try too :)
If you tried out the above recipe, let me know what version of sponge cake you have made, I would like to try too :)Sunday, November 16, 2008
How to make fishing game
How to make fish
materials required: coloured felt, polyster filling, movable eyes and paper clips.jpg) Draw your design on a piece of paper/cardboard and cut it out for use as template.
Draw your design on a piece of paper/cardboard and cut it out for use as template..jpg) Fold the felt into half and use your template to draw your design on the felt. Remember to leave enough spacing between the fishes.
Fold the felt into half and use your template to draw your design on the felt. Remember to leave enough spacing between the fishes. .jpg) Sew on the line you have drawn on the felt.
Sew on the line you have drawn on the felt.
.jpg) Leave a opening for stuffing polyster filling into the fish.
Leave a opening for stuffing polyster filling into the fish. .jpg) Stuff in the polyster filling and continue to sew to close the opening. Be careful not to step on your sewing machine paddle when you are stuffing the filling. Alternatively, you can remove your felt piece from the sewing machine to stuff in the polyster filling. I'm just too lazy to do so.
Stuff in the polyster filling and continue to sew to close the opening. Be careful not to step on your sewing machine paddle when you are stuffing the filling. Alternatively, you can remove your felt piece from the sewing machine to stuff in the polyster filling. I'm just too lazy to do so..jpg) Leave some allowance and cut out your fish.
Leave some allowance and cut out your fish. .jpg) Glue the eyes, put paper clips at the mouth position and make MANY MANY more......
Glue the eyes, put paper clips at the mouth position and make MANY MANY more......
materials required: coloured felt, polyster filling, movable eyes and paper clips
.jpg) Draw your design on a piece of paper/cardboard and cut it out for use as template.
Draw your design on a piece of paper/cardboard and cut it out for use as template..jpg) Fold the felt into half and use your template to draw your design on the felt. Remember to leave enough spacing between the fishes.
Fold the felt into half and use your template to draw your design on the felt. Remember to leave enough spacing between the fishes. .jpg) Sew on the line you have drawn on the felt.
Sew on the line you have drawn on the felt..jpg) Leave a opening for stuffing polyster filling into the fish.
Leave a opening for stuffing polyster filling into the fish. .jpg) Stuff in the polyster filling and continue to sew to close the opening. Be careful not to step on your sewing machine paddle when you are stuffing the filling. Alternatively, you can remove your felt piece from the sewing machine to stuff in the polyster filling. I'm just too lazy to do so.
Stuff in the polyster filling and continue to sew to close the opening. Be careful not to step on your sewing machine paddle when you are stuffing the filling. Alternatively, you can remove your felt piece from the sewing machine to stuff in the polyster filling. I'm just too lazy to do so..jpg) Leave some allowance and cut out your fish.
Leave some allowance and cut out your fish. .jpg) Glue the eyes, put paper clips at the mouth position and make MANY MANY more......
Glue the eyes, put paper clips at the mouth position and make MANY MANY more......How to make fishing rod
materials required: button, magnet, balloon stick, thin wire
.jpg) I got my thin wire from a sandwich bag, so it has plastic covering.
I got my thin wire from a sandwich bag, so it has plastic covering..jpg) Pull the thin wire through the holes of the button, twist to secure it and trim off the excess. You can skip this part if you are using button that has loop on the back.
Pull the thin wire through the holes of the button, twist to secure it and trim off the excess. You can skip this part if you are using button that has loop on the back. .jpg) Glue the bottom of the button to a piece of magnet with gun glue, and this will act as the "hook" for the fishing rod. Just tie this with string to a balloon stick and your fishing rod is done!
Glue the bottom of the button to a piece of magnet with gun glue, and this will act as the "hook" for the fishing rod. Just tie this with string to a balloon stick and your fishing rod is done!
.jpg) Just pull and tie the cotton cord to keep all the fishes in your pond :P
Just pull and tie the cotton cord to keep all the fishes in your pond :P
.jpg) I got my thin wire from a sandwich bag, so it has plastic covering.
I got my thin wire from a sandwich bag, so it has plastic covering..jpg) Pull the thin wire through the holes of the button, twist to secure it and trim off the excess. You can skip this part if you are using button that has loop on the back.
Pull the thin wire through the holes of the button, twist to secure it and trim off the excess. You can skip this part if you are using button that has loop on the back. .jpg) Glue the bottom of the button to a piece of magnet with gun glue, and this will act as the "hook" for the fishing rod. Just tie this with string to a balloon stick and your fishing rod is done!
Glue the bottom of the button to a piece of magnet with gun glue, and this will act as the "hook" for the fishing rod. Just tie this with string to a balloon stick and your fishing rod is done!Alternatively, you can just tie a U-shaped magnet to any stick.
Fish pond/bag
materials required: 2 pieces of fabrics, ribbon, cotton cord
Oh.... I don't have photos for this, forgot to take photo, but it is really easy.
Step 1: With the right sides of the 2 fabrics facing, cut out the shape of your fish pond.
Step2: Cut out several pieces of ribbon, about 5cm long. Fold your ribbons into half and sandwich them at regular interval between the 2 fabrics and secure them with pins.
Step3: Sew around the edge of the fish pond, leaving a small opening for turning over.
Step4: Turn the fabrics to the right sides and sew around the edge of the fish pond to close up the opening.
Step5: Cut a piece of cotton cord that is slightly longer than the perimeter of the fish pond. Thread the cotton cord through the ribbons and tie it up.
.jpg) Now you are ready for fishing.
Now you are ready for fishing.
.jpg) Now you are ready for fishing.
Now you are ready for fishing. .jpg) Just pull and tie the cotton cord to keep all the fishes in your pond :P
Just pull and tie the cotton cord to keep all the fishes in your pond :PHanhan was very happy when I turned the "fish pond" into a bag, immediately she took it and went out of the room. I went after her and asked,"Where are you going?" She replied,"gai gai!"(means going out) :)
Thursday, November 6, 2008
Funny hat
I realised these few days Hanhan started to play more on her own and she engaged herself with imaginary play. Yesterday, she pulled out my folded paper containers and started to count them, after that she put one on her head and told me "hat" and started to dance. .jpg) She looks so cute and funny in her "hat".
She looks so cute and funny in her "hat".
.jpg) Want to make one? Then click on the photo below to enlarge it.
Want to make one? Then click on the photo below to enlarge it.
 Oh... btw, I fold these paper containers to put food scraps, they are extremely useful during Chinese New Year.
.jpg) She looks so cute and funny in her "hat".
She looks so cute and funny in her "hat"..jpg) Want to make one? Then click on the photo below to enlarge it.
Want to make one? Then click on the photo below to enlarge it. Oh... btw, I fold these paper containers to put food scraps, they are extremely useful during Chinese New Year.
Thursday, August 21, 2008
How to play five stones
Five stones is a traditional Malay game. It requires 2 or more players taking turns. The aim is to score as many points as possible. A point is scored when a player completes the eight steps, then throw and catch as many 'five stones' as possible.
The player stops playing when
1) The stone, which is thrown in the air, is not caught in time.
2) The player touches or moves stones apart from those he has picked up.
When it comes to his turn again, he begins from the step where the mistake was made.
The winner is the one who has the highest score.
Enjoy the game!
The player stops playing when
1) The stone, which is thrown in the air, is not caught in time.
2) The player touches or moves stones apart from those he has picked up.
When it comes to his turn again, he begins from the step where the mistake was made.
The winner is the one who has the highest score.
Enjoy the game!
Wednesday, August 20, 2008
How to make Five Stones
Recently Daddy recaptured his younger days miss out and learnt to play five stones. I asked him should I make five stones for him, and he happily nodded his head.
This is how you make five stones.
 1) Cut 5 pieces of 6cm x 10cm retangular fabric.
 2) With the exterior facing, fold the fabric into half, as shown above, and sew both sides. I am using a 1cm allowance. Turn the fabric and it is ready for stuffing.
 3) You can fill it with seeds, rice or sand. Here I am using green beans, it works the same. Do not fill it up to the brim, as later you need to fold in the fabric and sew it up. As for how much beans to put in, it all depends on you, just make sure that all the five "stones" are filled with approximately the same amount of beans.
 4) Fold in the allowances, and aline the sewed sides to the center, as shown, and sew it up.
 5) Just sew 4 more, and your five stones are ready for playing.
 I also made mini ones for the little hand.
  Oh...... don't forget to make a little bag to keep them, or else you will have to make more to replace the lost one OR invent your own game of four/three stones.
.jpg) Hands on session for the little one.
Hands on session for the little one.
This is how you make five stones.
 1) Cut 5 pieces of 6cm x 10cm retangular fabric.
 2) With the exterior facing, fold the fabric into half, as shown above, and sew both sides. I am using a 1cm allowance. Turn the fabric and it is ready for stuffing.
 3) You can fill it with seeds, rice or sand. Here I am using green beans, it works the same. Do not fill it up to the brim, as later you need to fold in the fabric and sew it up. As for how much beans to put in, it all depends on you, just make sure that all the five "stones" are filled with approximately the same amount of beans.
 4) Fold in the allowances, and aline the sewed sides to the center, as shown, and sew it up.
 5) Just sew 4 more, and your five stones are ready for playing.
 I also made mini ones for the little hand.
  Oh...... don't forget to make a little bag to keep them, or else you will have to make more to replace the lost one OR invent your own game of four/three stones.
.jpg) Hands on session for the little one.
Hands on session for the little one. I have problem editing the video on how to play this game, will post it later. For those who are very eager to try the game, you can refer to the instruction over here (the section on five stones, is at the bottom), it's a bit lengthy, but very detailed.
Subscribe to:
Posts (Atom)